Monday, May 2, 2011

Secret Weapons Bone Fields Review Pt. 1

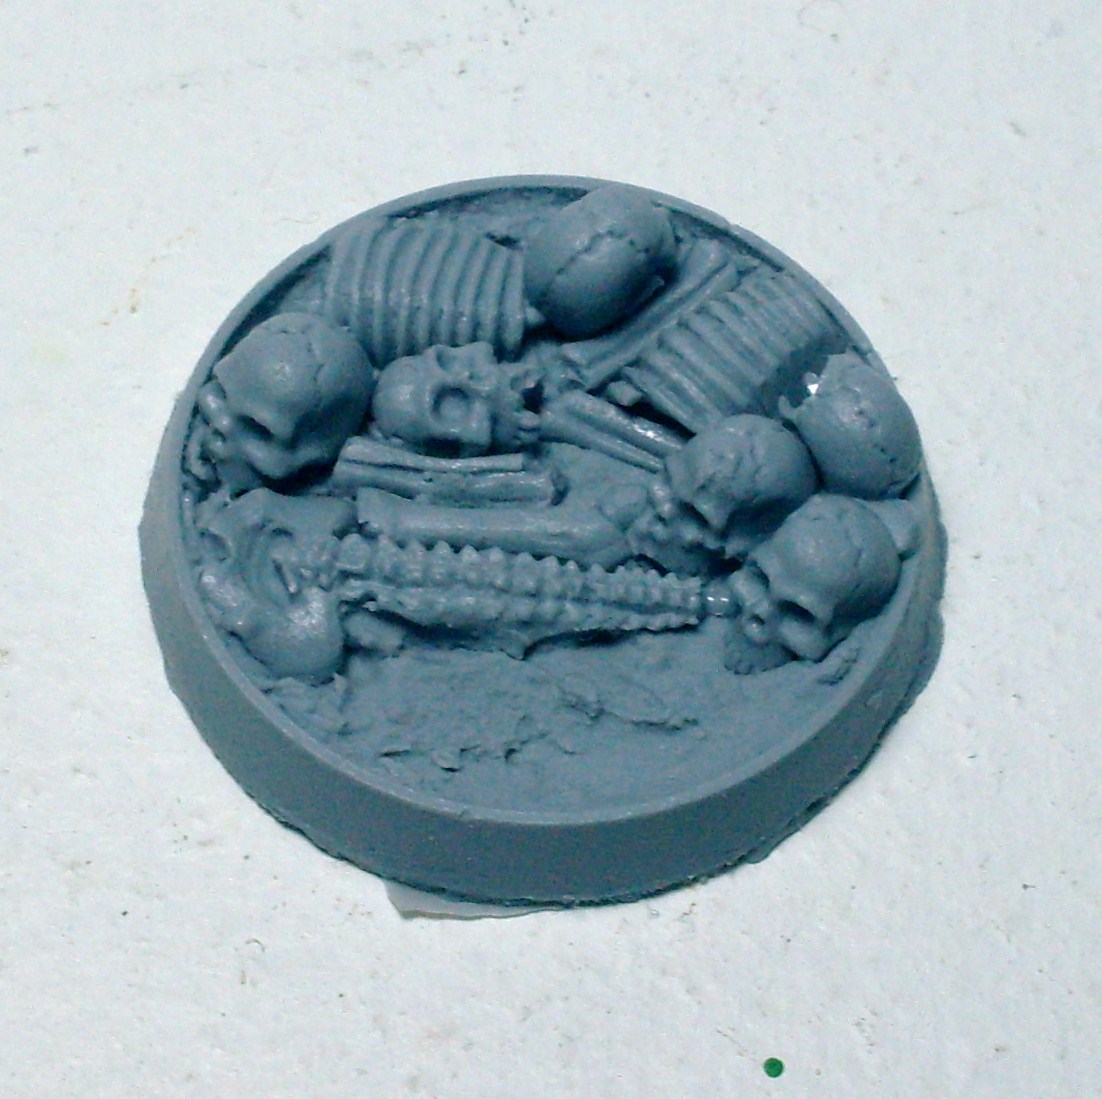
When I saw Secret Weapons Miniatures new Bone Fields line I knew I had to have them for my Dark Eldar.  This was a problem considering I'd already decided, no resin bases for my Dark Eldar.  Now, I must rebase a number of minis as I get new sets of ten BF bases in.  I received my first ten last week.  They've been prepped by soaking them in cool soapy water to remove the mold release agent still coating the bases.

Now the hard part!  Putting, mainly, metal minis on resin bases.  Oh the pins...the pins.  Test mini is an Incubi.  Problem 1:  Slot Bases.  Problem 2:  Stance is too far apart for easy pinning on the base.

Solutions?  Cut the slot off.  Grin and bear it.  Only one foot could be pinned onto the base.  This is because of another problem with the bases.  Really, my only problem with them, but I'll get into that further down.

First, the bases themselves:
Only photographed eight of the bases.  One is on the Incubi.  Another, I forgot to pick up from the table.  Sucks because it was my favorite of the set.


I love these bases.  High quality resin and sculpting.  They ooze personality even before you add water effects to simulate blood pooling around the bones.(Which I fully intend to do when I have the cash for the water effects)

Now, here's the Secret Weapons base I ordered about two years ago for my Space Wolves.  This particular base belongs to the Runic Mountain set.

At this time, Secret Weapons was putting out a white resin product that I didn't really like.  Mine had a few air pockets on the bottom.  Not a huge deal.  Understandably, its a part of the casting process.  This is what they looked like unpainted.  These are not Runic Mountain bases, but part of an urban set I believe.
I wasn't quite satisfied with Secret Weapons quality so I switched to Dragonforge Miniatures Resin bases for the rest of my Space Wolves.  Notably, the Slate Wasteland series.  Here's an example.
As you can see, Dragon Forge uses a grey resin material.  Great bases.  I was happy with them from the start.

Complaints with the Bone Field Secret Weapons bases:
Not many to be honest.  I had a couple with their previous resin, but they seem to have moved to grey resin so those complaints are moot.  My only complaint is that they're too full of cool ass detail.  The bones make it a bit challenging to properly base your model.  Small complaint and with some creative thinking this is easily handled.

Summation:

I like where Secret Weapons seems to have gone with this line.  My previous problems with their products aren't applicable now.  This impresses me because a good business is constantly changing and improving.  I'm going to continue buying from both; Dragonforge and Secret Weapons.  Both companies have great shipping times, fair pricing, and the quality disparity is unnoticeable.  Dragonforge is a smaller scale operation, but the man behind it has recently spoken about expanding his operation on his blog.(He works by himself as I understand it)  Secret Weapons carries more than just bases in their product lines.  They have some good washes licensed from Les from Awesomepaintjob on Youtube.  If you haven't seen his videos go check them out.

Second part of the review is coming as soon as I can get the water effects and fully paint the test Incubi.  It'll be painted in the same fashion as my previously featured test Incubi.

Links to the companies mentioned in this review:

Link to the product featured in this review:


Sunday, May 1, 2011

Osama bin Laden is dead, Remember those who have fallen

I'm sure this will be one of many blogs regarding this issue.  I apologize to any non-Americans for wasting your time on off topic BS, but this is a good day for us.  We had all, but given up on a resolution to that day so long ago.

I just want to send my thanks out into the universe.  Thank you for the tireless efforts of our military and intelligence forces.  Especially, the special operations team that successfully executed their mission.  Thank you to Pakistan for their aid in locating him.  Thank you for all foreign aid and well wishes that have been given to the US in our time of need.  The world cared.

My regret is that we wasted so many lives and time in Iraq for the sake of pretense.  It makes me sick when I think of how the previous administration's incompetence and outright corruption sullied the reputation of our homeland.

That said, all nations must remain vigilant because, in the end, there is no justice.  There's just us.

Saturday, April 23, 2011

Wolf Lord and Archon Progress

Made an order to the Warstore and Secret Weapons Miniatures today.  This motivated me to get some work done on projects collecting dust.  Namely my Bran Redmaw model.  He was my first attempt at magnetizing a terminator chassis and arms.  The torso was dremmeled out and magnets were superglued and green stuffed into place.  At first, I cheaped out and only used paper clips bent into circles and green stuffed onto the arms.  This was done to conserve magnets, but the hold has never been to my liking.  I decided to dremmel out some new arms and build up a configuration to make him a Counts As Logan Grimnar.  Logan's going to unlock Wolf Guard as troops for me, but his GW official model is ridiculous looking.

In total, this one magnetized Wolf Lord Chassis will eventually come to represent various Wolf Lords/Wolf Priests/Rune Priests/Logan Grimar/Njal/etc etc.

I also finally got off the fence and ripped off the arms on my Archon.  Dusk Blade + Soul Trap is a nasty configuration, but I prefer the cheaper Agonizer/Blaster setup in games that aren't IC heavy.


A bunch of new Grey Knight bits on my cutting board.

Thursday, April 21, 2011

Beastmaster and Reaver WIP

Still plenty of detailing and clean up to do on these.  I'm kind of floundering on the Reaver.  I cannot edge highlight well and I'm not a big fan of the style.  The Reaver design is just so pretty that it demands the effort and I figure this will be practice.


I say we combat Mat Ward's cheese by making PFP count x2 vs. Grey Knights.  Their souls would be extra delicious.

Sunday, April 10, 2011

Warhammer 40K: Space Marine Behind the Scenes vid

Saw this over at Kotaku.  Might be old news to some, but I just ignore the talking heads and stare at the pretty pictures.

Friday, April 8, 2011

Clawed Fiend Model Review (pic heavy)

Let me start by saying that I hated this model when I originally saw the Advanced Order shot on Games Workshop's website.  Owning this model and painting it has completely changed my opinion.  I intend on getting two more.  It was such a pleasure to paint.  The sculptor gave us some awesome texture and depth to work with.  I'm only a mediocre brush monkey and I've achieved an acceptable result.  I'd love to see what a talented painter could produce with it.  I started with the intention of making a tutorial, but after the first few steps I got lost in the act of painting and decided that it was such an easy model to work with that a tutorial would be redundant.

There are some downsides though.  The model is big and heavy.  I should have included a scale pic, but its about twice the size of a Space Marine.  Pinning is pretty much mandatory.  The model is split into four pieces.  The main body, the right arm, the left leg, and the tail.  Each piece should be pinned.  Even the tail.  Its tab and corresponding slot are not substantial enough to weather handling and transport in my opinion.  There will be gaps after pinning so be sure to have green stuff available.  The gaps will be small though so you won't have to be a GS expert to conceal it from anything, but the closest scrutiny.

I must admit to a bit of sticker shock.  At nearly 23 USD the prospect of purchasing enough for a full Beast Unit was daunting, but the model has grown on me.  I'm going to build it up to five Beastmasters(one metal and the rest converted from Hellions), three Clawed Fiends, four Khymerae, and two Razorwing flocks.  Expensive, but it'll look great on the table and provide a solid assault unit via my Haemy's webway portal.

Finished model (aside from the base which still needs work)

The components

This is a simple base made out of pieces of cork.  You can find rolls of cork in most stores.  This was my first attempt at it so the results are a bit meh.  I originally used PVA glue, but found that super glue produced better results and less separation between layers.

It was easy to poke a hole through the cork with the peg at the bottom of the model's rock perch.  The model itself is too heavy to not pin it to the base in some fashion or another.

The body.  Notice the aforementioned peg.  The model had some flash, but surprisingly less than GW's metal models usually have.

Dry fit front view


I didn't fix the tale to the model during the painting process because it would have been too awkward.  This is after priming it with Duplicolor Sandable Primer Dark Grey.  My primer of choice available in most U.S. auto retailers for about 6 USD.

After applying a basecoat of Games Workshop's Adeptus BattleGrey foundation paint to the fur and base.

A basecoat of Modian Blue foundation followed by a wash of Asurmen Blue.  Then a wash of Badab Black.  Then I worked back up with a thin layer of Enchanted Blue.  Then highlighted the raised areas with Enchanted Blue mixed with Vallejo Cold Grey.  Mixing more grey in with the blue to create lighter highlights near the area where light might be hitting from overhead.  This was just simple layering.  As you can tell, I'm not the best of painters, but I feel it produced an acceptable standard for table top.


Skipping a bunch of steps ahead...we have the nearly finished model.  The fur was done with Vallejo's Hexed Purple and then mixing in White to varying degrees to provide a highlight which was dry brushed in appropriate areas.  The face was just Mechrite Red base.  Then Gory Red.  Then Bloody Red.  Then a highlight using just the side of the brush with a Bloody Red/Orange Fire mixture. 


Next model on deck is: