Here's a completed base as an example. The Incubi is not completed. I still need to clean up a lot of the stuff on him and finish the gems.
I'm pleased with how it came out. The blood level is a bit low, but I'm refining my process.
The Good: The bases made by Secret Weapons Miniatures are sculpted very well in my opinioin. Easy to paint and look great when finished. Note: you don't have to fill them in with blood. They are perfectly fine when painted normally, but I prefer them this way because of my army theme. The resin is soft and easy to work with. IE Drilling, Pinning, Cutting Pricing is very fair in my opinion.
The Bad: They're light. This poses a problem with metal minis and minis that aren't completely centered.
As you can see, this Scourge is mounted on a rock as part of its sculpt. This meant few of the bases could actually be used without scraping out some of those lovely bones. It also meant that I had to find a proper open area on the base to pin the mini. In this case, the rear of the base. The weight of the resin was a major problem. I solved it by drilling three holes and gluing shotgun pellets into them as a counter weight at the front of the base. Any material can be used as a counter weight. Its not hard to do, but it is an extra hurdle.
The bases are slightly too small to comfortably fit a model that doesn't have its legs ramrod straight below its body. I'm sure you could tell this from the first pictures. Some filing/cutting has to be done in order to fit one or more of the feet over the edges of the base.
Final Verdict: I love them. Minor frustrations aside, these are great bases for certain armies. A pro painter could put out even higher quality than I did above. I've got thirty 25mm bases and five 40mm bases to deck out a good sized portion of my Dark Eldar. Once complete, I've already got a display board theme all mapped out. Blood Orgy!!
Definitely worth the very reasonable price that Secret Weapons is asking.
I'll be putting up a tutorial on how to get the blood effect within the next couple days.
Showing posts with label Product Review. Show all posts
Saturday, June 11, 2011
Monday, May 2, 2011
Secret Weapons Bone Fields Review Pt. 1
When I saw Secret Weapons Miniatures new Bone Fields line I knew I had to have them for my Dark Eldar. This was a problem considering I'd already decided, no resin bases for my Dark Eldar. Now, I must rebase a number of minis as I get new sets of ten BF bases in. I received my first ten last week. They've been prepped by soaking them in cool soapy water to remove the mold release agent still coating the bases.
Now the hard part! Putting, mainly, metal minis on resin bases. Oh the pins...the pins. Test mini is an Incubi. Problem 1: Slot Bases. Problem 2: Stance is too far apart for easy pinning on the base.
Solutions? Cut the slot off. Grin and bear it. Only one foot could be pinned onto the base. This is because of another problem with the bases. Really, my only problem with them, but I'll get into that further down.
First, the bases themselves:
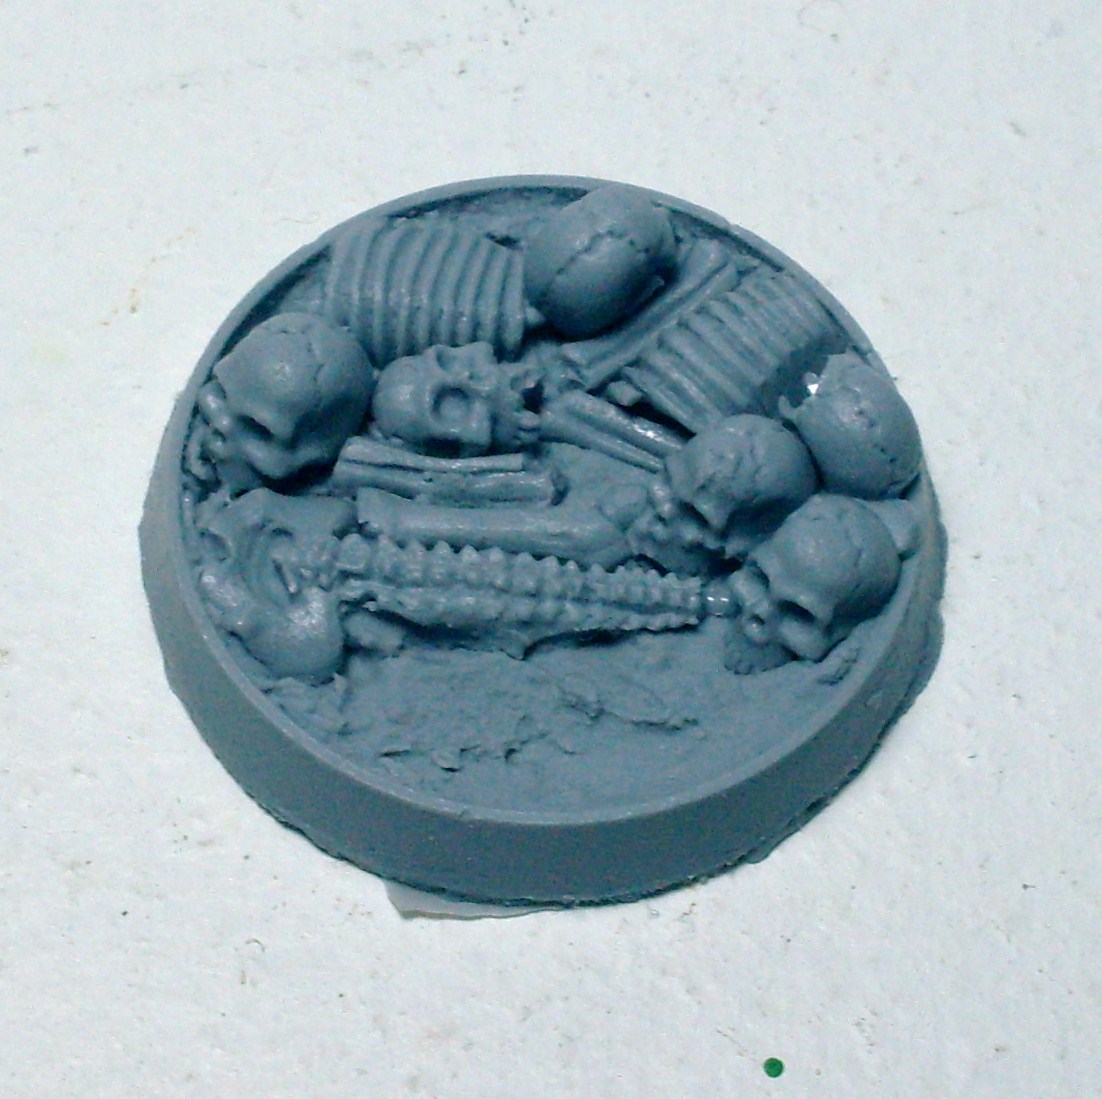
| Only photographed eight of the bases. One is on the Incubi. Another, I forgot to pick up from the table. Sucks because it was my favorite of the set. |
I love these bases. High quality resin and sculpting. They ooze personality even before you add water effects to simulate blood pooling around the bones.(Which I fully intend to do when I have the cash for the water effects)
Now, here's the Secret Weapons base I ordered about two years ago for my Space Wolves. This particular base belongs to the Runic Mountain set.
At this time, Secret Weapons was putting out a white resin product that I didn't really like. Mine had a few air pockets on the bottom. Not a huge deal. Understandably, its a part of the casting process. This is what they looked like unpainted. These are not Runic Mountain bases, but part of an urban set I believe.
I wasn't quite satisfied with Secret Weapons quality so I switched to Dragonforge Miniatures Resin bases for the rest of my Space Wolves. Notably, the Slate Wasteland series. Here's an example.
As you can see, Dragon Forge uses a grey resin material. Great bases. I was happy with them from the start.
Complaints with the Bone Field Secret Weapons bases:
Not many to be honest. I had a couple with their previous resin, but they seem to have moved to grey resin so those complaints are moot. My only complaint is that they're too full of cool ass detail. The bones make it a bit challenging to properly base your model. Small complaint and with some creative thinking this is easily handled.
Summation:
I like where Secret Weapons seems to have gone with this line. My previous problems with their products aren't applicable now. This impresses me because a good business is constantly changing and improving. I'm going to continue buying from both; Dragonforge and Secret Weapons. Both companies have great shipping times, fair pricing, and the quality disparity is unnoticeable. Dragonforge is a smaller scale operation, but the man behind it has recently spoken about expanding his operation on his blog.(He works by himself as I understand it) Secret Weapons carries more than just bases in their product lines. They have some good washes licensed from Les from Awesomepaintjob on Youtube. If you haven't seen his videos go check them out.
Second part of the review is coming as soon as I can get the water effects and fully paint the test Incubi. It'll be painted in the same fashion as my previously featured test Incubi.
Links to the companies mentioned in this review:
Link to the product featured in this review:
Tuesday, August 17, 2010
Forgeworld: Awesome or The Ultimate Evil?
Having just laid down a unifying layer of GS to my Rune Priest in order to make the top view more smooth I had time sitting and staring at it cure.
I took this time to get something done for my Mark of the Wulfen GH. I've decided to denote their special status through facial tattoos and two close combat weapons.(at least for now...I've got my eyes on the Maxmini Werewolf heads)
First one will have two chain axes. I ordered a pack of ten resin axes from Forgeworld a while back and this was a chance to use another two. The pack includes two different marks of Chain Axes. They're separated by the shape of their heads. THEY ARE INSANELY FRAGILE.
My first attempt at modeling these was less than successful. I initially tried green stuffing it to a hand, but that didn't stick after drying. I then just super glued it, but the shaft itself snapped under the pressure of me painting it with Boltgun Silver. Did I mention they were fragile?
Best option is simple pinning...despite the hassle of drilling a thin resin shaft.(the reason I didn't pin on the first GW)
| First cut the axe to fit the arm you're pinning it too. You don't want an axe thats too long or too short. Just right. |
| Drill a corresponding hole into the hand you want to pin the axe too. Now, don't do what I did and actually line up the hole with the pommel already on the arm...if there is. |
| Notice how professional that looks? Meh, hopefully no one will notice...I know they will, but thats the story I'm going with. |
Anyways, its not that different than how you'd normally pin plastic, but it demands a tad bit more care.
Miscellaneous Thoughts:
Use old paper clips. Don't waste cash/etc on pinning rods from hobby sites/stores.
I generally put super glue over the hand hole and then put the paper clip into it. Let it dry a minute and then use hobby clippers to cut away the rest of the paper clip. That way you won't have shards of metal flying when you cut. Use more super glue when applying the resin.(Pro-Tip: Plastic glue won't work well. Super glue always for metal and resin!)
Subscribe to:
Posts (Atom)